Create a Site with WordPress: Installing a Local Environment

YNOT EUROPE – In the previous article we examined the prerequisite software your server must contain in order to run WordPress as a content-management system. Today we will discover how to set up an environment in which to install on your PC the latest version of WordPress.
Imagine our project as if it were a human body. The skeleton is represented by PHP, MySQL and Apache; the heart and vital organs are the CMS and all the equipment that will allow the proper functioning of the body.
To prepare a suitable environment for running WordPress on your desktop computer, we have two possibilities: intall each component individually, which is difficult and time-consuming, or us pre-built packages, which is much easier. For most users, installing a package is the most viable method, so that’s the one we’ll discuss here.
I’ve chosen a package called “WAMP,” an acronym that stands for Windows, Apache, MySQL and PHP. It will create a local web environment that is complete and ready to support your site in WordPress.
The package currently includes:
- Apache 2.2.11
- MySQL 5.1.36
- PHP 5.3.0
As you can see, in one place, we have all the prerequisites for WordPress, including phpMyAdmin and SQLiteManager for administration and management of the database.
Installing WAMP
Here are all the steps necessary for proper installation of the software:
• Download the package (it’s freely available under GPL) at the developer’s official site. You will be asked to provide some personal data that will help the site managers to provide updates and announcements, but mailings are few.
• Double-click on the package you just downloaded to start the installation. It is important to remember the path where you install the program, since knowledge of the location of the program folders is crucial to subsequent installation of the CMS (WordPress). An installation dialogue very similar to the image below will appear on your screen:

The default installation path is C:\wamp, and unless you have a specific reason to change it, I recommend you leave the path as-is.
• During installation, you can choose to have the installer place a WAMP shortcut icon on your desktop, but the program always will be available through the Start menu. WAMP won’t start until you click one shortcut or the other, so there’s no need to worry about the environment loading on system startup.
• The installation should finish without problems at this point by double-clicking on the desktop icon or the Start menu shortcut.
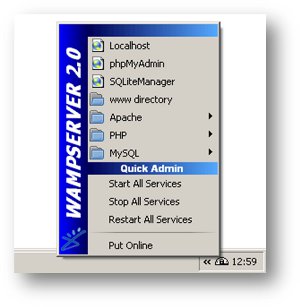
• When WAMP loads, it will place a speedometer near the clock in your system tray. Right-clicking the speedometer will allow you to set some options (like language) or select Exit to close the program.
• If you left-click the speedometer, you will face a menu of the type shown in the following image:

The various items are used to manage database administration tools, specifications of each program installed and start, stop or restart all services.
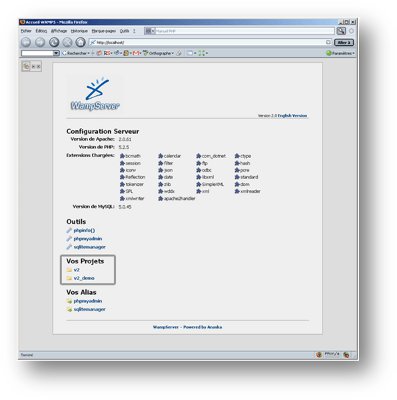
• Click on Start All Services and you will notice that the hand of the tachograph moves to the right near the clock, indicating the environment is live. Selecting Localhost will start your default browser, which will display the following page if your installation was successful:

Congratulations! The foundations have been laid to install WordPress, and you can turn off the environment.
In the next article we will see how to configure the database to host the world’s most popular CMS.
This article was written for YNOT Europe by Eng. Antonio Lodesani. For more information, visit ingoccupati.blogspot.com.
Comments are closed.


